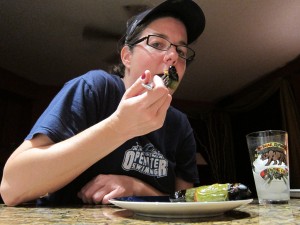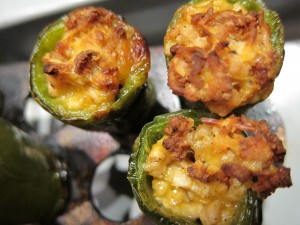
Sometimes, someone gives you the perfect gift: For Patrick, it was a Louisiana-shaped chile-roasting rack for his grill, courtesy of my Mom and Dad. Never again would we consider eating frozen, flash-fried jalapeño poppers from a box.
Because we could now make our own. Which means, it’s time to bring the pain!
Warning: The actual cooking of these peppers involves knife-handling skills, open flames and spicy substances. Don’t put an eye out, don’t rub your eyes and don’t let your kids make them unsupervised. According to Pat, I’m not allowed to make them unsupervised either – for all of the above reasons.
TOOLS, PART 1: Things You Likely Have Around the House
- Non-stick cooking spray
- Skillet
- Spatula or wooden spoon
- Paper towels
- Thin-bladed knife or fillet knife
- Grapefruit spoon – these are usually small enough to core the chile and are less likely to result in a trip to the emergency room
- Cutting board
- Mixing bowl
- Measuring spoon
- Kitchen scale
- Grill
- Oven mitt or tongs
- Cookie sheet
TOOLS, Part 2: Stuff You Might Have to MacGyver (but will still need)
- Chile Pepper Roasting Rack (You should be able to find these at big box retailers like Wal-Mart, Target or Bed, Bath and Beyond; you’d better be able to find them at specialty kitchen stores like Williams-Sonoma or Sur La Table – and I really, really hope you can find them at a locally owned joint nearby, as that’s where Mom and Dad got Pat’s. They cost anywhere from $10-$25)
- Grill Rack / Heavy Gauge Wire / Pliers (if you can create a grid with one-inch square spaces, you’re golden)
TOOLS, Part 3: Optional but handy
- Surgical gloves – you may or may not feel the need to protect your hands. You will be handling pepper membranes and seeds which can sting if they touch an open cut. Some folks have more sensitive skin than others. Even if you are wearing gloves, remember: DON’T RUB YOUR EYES.
- Chile-coring device – some pepper-roasting racks come with these, we’re not crazy about them as they tend to damage the peppers, but they seem to be a safer option than knives in the hands of some people (me)
INGREDIENTS: This recipe makes a lot of poppers because we figure if you’re going to the effort, you might as well feed a few people. (See gumbo, grits, red beans and rice, ribs of awesomeness and muffalettas). Go big or go home. Truth be told, math is not our strongest suit, so reducing this recipe down into normal proportions required long-division and measurement conversions that cut into our drinking time. It’s a pretty easy recipe to halve and that will make about four servings. One serving is 3 stuffed peppers. What follows is the low-calorie recipe – and following the end of this culinary excursion, we’ll show you how to make a Jalapeño Pop-an-artery:
- One 20-ounce package of extra-lean ground turkey (We like Jennie-O Extra Lean)
- 2 cups of FINELY shredded 2% reduced-fat cheddar or 2% reduced-fat Mexican mix cheese
- One package of your favorite taco seasoning (or the Pat Bertinelli Special Sprinkle of Doom – see below)
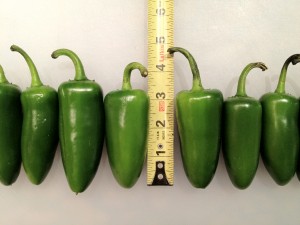
- 20-24 big jalapeño peppers – aim for 1-inch in diameter at the widest point and 3-4 inches long. Get the biggest ones you can find.
- Salt and pepper to taste
DIRECTIONS:
Coat your skillet with nonstick cooking spray and pre-heat over medium-high heat. Brown the ground turkey, per package instructions. As you’re cooking, mix in the taco seasoning and break up the turkey meat into small pieces using your spatula or wooden spoon. The pieces should be about the size of small pebbles or kernels of corn (she said ‘corn’). Small and crumbly wins the day. Once the meat is browned and cooked thoroughly (usually about 10 minutes), drain it onto a paper towel to get rid of any excess fat, spread the meat out in a thin layer and allow it to cool. While the meat is cooling, you can start coring the peppers.
Here comes the first of our obligatory safety tips: Rinse the jalapeño peppers thoroughly – we don’t want your dining companions to get e.Coli from your sloppy hygiene and blame it on us. Put on your (optional) surgical gloves. The seeds and membranes of the peppers are what makes them hot, so take care as you handle these parts of the pepper. Don’t rub your eyes. Be careful if you have open cuts – and please, don’t stab yourself in the process of cutting the jalapeño because a) we don’t want you to have to go to the emergency room and b) it burns! IT BURNS!
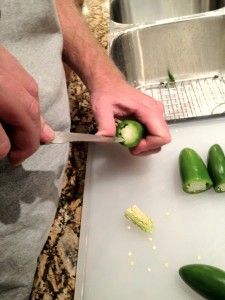
Lay the peppers on their sides on your cutting board, and at the thickest point of each pepper, slice the stem or “top” off the jalapeño. Discard the stems.
CAREFULLY insert your knife into the pepper in the space between the center membrane and the pepper wall. Inserted about one inch into the pepper body, the knife blade will be laying against the pepper wall so you can GENTLY carve a circle around the inside to loosen the membrane. Slowly slice through the portions of membrane that still cling to the pepper wall. Now you’re ready to remove the core: You can insert a grapefruit spoon between the pepper wall and membrane and gently dig the membrane and seeds out, being careful not to puncture the pepper wall. If you’re confident with your knife-handling skills, you can gently press the side of the knife-blade into the side of the membrane to pry the membrane away from the wall. You will hear and feel it separate. Work your way around the pepper separating the membrane in this fashion and slowly prying the it out. BE CAREFUL! DON’T STAB YOURSELF. It doesn’t take a lot of pressure to get the membrane to come out of the pepper. After the membrane is loosened and jutting out slightly, you should be able to pull it out with your fingers and discard it – BUT DON’T RUB YOUR EYES! Tap the open end of each pepper on the cutting board to dislodge and dump out any leftover seeds. This will help keep the heat in check. Brush the seeds into the trash, but DON’T RUB YOUR EYES!
Once the peppers are cored, pull out the chile-pepper roasting device of your choosing – either an official, store-bought rack or a jury-rigged grill-rack. Stand the peppers pointy-side-down into the rack. If they are too thin and look like they might slip through the holes, be at the ready with your toothpicks.
The meat should be cool by now, so dump it into your mixing bowl with the two cups of FINELY shredded low-fat cheese. We cannot emphasize the FINELY SHREDDED nature of the cheese. You want it to melt consistently, and that’s easier to do if it’s FINELY SHREDDED cheese. Mix the meat and cheese thoroughly.
Preheat your grill to medium heat.
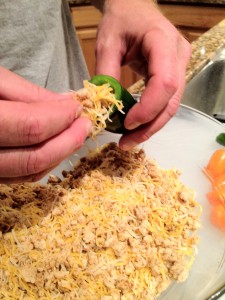
Now you’re ready to start stuffing: Use a tablespoon to scoop up a level amount of the meaty-cheesy goodness and set it aside. Conversely, you can also measure out one ounce of meaty-cheesy happiness on your kitchen scale (I call this the drug-dealer method). This is roughly the amount of stuffing that will fit into a large pepper – one level tablespoon or one ounce. Pick a pepper, any pepper, and remove it from the rack. Sprinkle a small pinch of the meaty-cheesy goodness inside and gently tap the tip of the pepper on your cutting board to get the mixture to settle into the bottom. Then take a healthier pinch off the top of that tablespoon / ounce and shove it into the pepper. No need to be delicate at this point. Pat likes to use his pinkie finger to push the mixture down in there. You’re stuffing peppers and you can stuff them pretty densely as the meat-cheese mixture is going to have a lot of air in it. When you start to cook the peppers, the cheese will melt and the skins will loosen up, so it’ll make more room. Once you finish one pepper, place it back on the rack. If the pepper sinks more than halfway down into the rack, insert a toothpick through the center of the pepper and perpendicular to the rack surface to keep it sliding through when you’re cooking. Repeat this process for all of your peppers.
WARNING: This is where Pat goes off the rails. We all agree that through his years of intense training and self-abnegation, his mouth has evolved to sustain temperatures that are damaging to normal human tastebuds. I don’t think that justifies making habanero poppers that feature the spiciest seasoning known to mankind: Blair’s Nitro Death Rain. Jalapeños have plenty of heat – and even more, our friends can still enjoy them. You’re not missing anything by making poppers out of the HOTTEST WIDELY AVAILABLE PEPPERS KNOWN TO MAN – and really, you’re not proving anything by eating the newly named, Habanero Hellfire – or as I like to call them, The Weapons of Ass Destruction. Suffice it to say, don’t think you’re kissing me with that mouth after you just ate that habanero popper… and you might also want to sit down to pee and use fresh surgical gloves to complete any necessary toileting. Moving on…
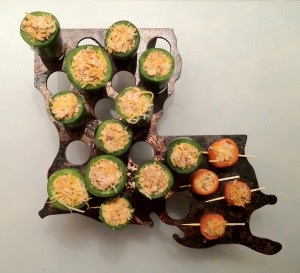
Using the tongs that came with the chile-pepper device of your choosing (or your trusty oven mitts), place the pepper-packed rack on your grill. It will take 10-20 minutes to roast the peppers, depending on your grill, so keep a close eye on them. The skins will start to loosen and wrinkle, going from a true green color to an olive drab. The cheese on top will bubble and brown. Don’t be alarmed when the bottom of the peppers turn black beneath the grill rack. Using your tongs or oven mitt, remove the rack and place it on your cookie sheet to carry it back to the kitchen. This will protect your feet and floors in case any of the peppers may have ruptured and are leaking cheesy goodness that now has an internal temperature of lava.
Allow your poppers to cool slightly and serve while still warm. They will not be overwhelmingly spicy, especially if you were careful to remove as much of the membranes and seeds as you could. Though we normally think of poppers as an appetizer, if you start with big enough jalapeños, you can eat one serving of three poppers with a side of black beans and rice for a very tasty – and filling – meal!
And now for the Popper Redemption Smack-down, wherein we compare the original store-bought jalapeño poppers with our new-and-improved homemade version. (Spoiler alert – WE WIN):
Serving Size:
- Theirs: 3 poppers (fried and waiting for your oven)
- Ours: 3 poppers (but our peppers are physically larger – so you get more popper per serving)
Calories:
- Theirs: 280 per serving
- Ours: 150 per serving
Total Fat:
- Theirs: 19 grams / 7 grams of saturated fat
- Ours: 8 grams / 4 grams of saturated fat
Total Carbohydrates:
- Theirs: 24 grams
- Ours: 5 grams
Total Protein:
- Theirs: 4 grams
- Ours: 19 grams
- Theirs: Meh
- Ours: For the Win!
